 |
| All Supplies Available from A Muse Studio |
- 0 - Blender Pen
- R29 - Lipstick Red
- Y17 - Golden Yellow
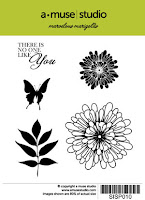
Stamp the large flower in the corner using your Memento Black ink and then color it using the technique that you practiced last time. I colored the entire flower yellow and then added red in the center. I darkened each petal as needed by adding a second layer of yellow and then using the marker to pick up some red and make the petals a darker orange. Blend while the yellow is still wet and do each petal individually. Add some yellow over the top if you need help blending.
Once the large flower is colored then you can mask it by stamping another flower onto a post-it note and cut carefully just inside the edges. Place the post-it note flower over the colored flower to protect it and use the smaller flower stamps to stamp your papaya, orange and cherry flowers with our delicious rich ink. Once it is dry you can remove the mask.
Stamp your sentiment, add pearls (color them first with your Copics if desired) and mount onto black card front and orange card base. Voila! This concludes your Copic lessons for August. Next week I will give you a head's up on what is needed for September.
Marigolds Card Supplies Used:
- Marvelous Marigolds Stamp Set
- Paper - Sugar, Onyx, Orange
- Memento Black Pad
- Copic Marker - Colorless Blender
- Copic Marker - Lipstick Red
- Copic Marker - Golden Yellow
- A Muse Studio Inks - Cherry, Papaya, Orange
- Pearl Stickers - Sugar
 |
| Marvelous Marigolds |
All Supplies Available from A Muse Studio
I will be holding a monthly workshop in my home in Huntington Beach, CA so let me know if you want to join me.

1 comment:
Marvelous Marigold is one of my favorite stamp sets. I love the colors you used.
Post a Comment